The Path to 2.0
Shiny is a Xamarin Framework designed to make dealing with device & background services easy by bringing things like dependency injection, logging, and lots of utilities to bring your workflows to the background in friendly, testable, way!
Version 2.0 is months of work, hundreds of commits (1166 to be exact), and a lot of discovery around how to improve the end experience. This release focused on improving the background experience even more especially on Android. Android is the source of great pain when it comes to backgrounding and especially around expectations that people have (for instance, real time background GPS). As such, Shiny now uses foreground services in most of these places. As a developer using Shiny, this is completely transparent change for you unless you want to customize the notification.
Now that I'm done with the boring rant. Let's talk about some of the cool new features
- Boilerplate Code
- Static Class Generation
- Microsoft Extensions Logging
- BluetoothLE
- Local Notifications
- Push Notifications
- Beacons
Death to Boilerplate Code
This was the first source of support pain and issues that users had was usually missed (or wrong) setup. In 2.0, I set out for how to remove this issue. With the latest C# 9/.NET5 release, source generators were released. This allows for code to be injected in the places Shiny needed it. To make things even more convenient for users, I can also wire up all of their Xamarin Forms, Xamarin Essentials, and other 3rd party source code.
To get an idea, here is a before and after showing both iOS and Android boilerplate
// Android App
[global::Android.App.ApplicationAttribute]
public partial class MainApplication : global::Android.App.Application
{
	public MainApplication(IntPtr handle, JniHandleOwnership transfer) : base(handle, transfer) {}

	public override void OnCreate()
	{
		this.ShinyOnCreate(new Samples.SampleStartup());
		global::Xamarin.Essentials.Platform.Init(this);
		base.OnCreate();
	}
}

// Android Activity
public partial class MainActivity
{
	protected override void OnCreate(Bundle savedInstanceState)
	{
		this.ShinyOnCreate();
		TabLayoutResource = Resource.Layout.Tabbar;
		ToolbarResource = Resource.Layout.Toolbar;
		base.OnCreate(savedInstanceState);
		global::Xamarin.Forms.Forms.Init(this, savedInstanceState);
		this.LoadApplication(new Samples.App());
	}

	protected override void OnNewIntent(Intent intent)
	{
		base.OnNewIntent(intent);
		this.ShinyOnNewIntent(intent);
	}

	protected override void OnActivityResult(int requestCode, Result resultCode, Intent data)
	{
		base.OnActivityResult(requestCode, resultCode, data);
		this.ShinyOnActivityResult(requestCode, resultCode, data);
	}

	public override void OnRequestPermissionsResult(int requestCode, string[] permissions, [GeneratedEnum] Permission[] grantResults)
	{
		base.OnRequestPermissionsResult(requestCode, permissions, grantResults);
		this.ShinyOnRequestPermissionsResult(requestCode, permissions, grantResults);
		global::Xamarin.Essentials.Platform.OnRequestPermissionsResult(requestCode, permissions, grantResults);
	}
}
// Android Application - you don't even have to make one
// Android Activity
public partial class MainActivity : Xamarin.Forms.Platform.Android.FormsAppCompatActivity
{
}

[assembly: ShinyApplication(
	ShinyStartupTypeName = "Samples.SampleStartup",
	XamarinFormsAppTypeName = "Samples.App"
)]
// iOS AppDelegate - all features used
public partial class AppDelegate
{
	public override bool FinishedLaunching(UIApplication app, NSDictionary options)
	{
		this.ShinyFinishedLaunching(new Samples.SampleStartup());
		global::Xamarin.Forms.Forms.Init();
		// third party inits
		this.LoadApplication(new Samples.App());
		return base.FinishedLaunching(app, options);
	}
	public override void RegisteredForRemoteNotifications(UIApplication application, NSData deviceToken) => this.ShinyRegisteredForRemoteNotifications(deviceToken);
	public override void DidReceiveRemoteNotification(UIApplication application, NSDictionary userInfo, Action<UIBackgroundFetchResult> completionHandler) => this.ShinyDidReceiveRemoteNotification(userInfo, completionHandler);
	public override void FailedToRegisterForRemoteNotifications(UIApplication application, NSError error) => this.ShinyFailedToRegisterForRemoteNotifications(error);
	public override void PerformFetch(UIApplication application, Action<UIBackgroundFetchResult> completionHandler) => this.ShinyPerformFetch(completionHandler);
	public override void HandleEventsForBackgroundUrl(UIApplication application, string sessionIdentifier, Action completionHandler) => this.ShinyHandleEventsForBackgroundUrl(sessionIdentifier, completionHandler);
}
[Register("AppDelegate")]
public partial class AppDelegate : Xamarin.Forms.Platform.iOS.FormsApplicationDelegate
{
}

[assembly: ShinyApplication(
	ShinyStartupTypeName = "Samples.SampleStartup",
	XamarinFormsAppTypeName = "Samples.App"
)]
To get this "voodoo" magic. Simply install the  nuget package into your head projects and add the attribute as shown in the "after" tabs above. Also note how the activity and appdelegate are partial.
These new generators can even build your entire startup class, but that's a discussion for a future article :)
nuget package into your head projects and add the attribute as shown in the "after" tabs above. Also note how the activity and appdelegate are partial.
These new generators can even build your entire startup class, but that's a discussion for a future article :)
NOTE: If you are using this on Azure DevOps or CI systems, MSBuild 16.8 is required which is not part of Mono yet. You need to use a tool like Boots to update to the latest beta OR simply use the "BEFORE" versions above and install  instead
Static Class Generation
There are a lot of users that don't like dependency injection. I can't see or live in a world without it (for now).
With those thoughts in mind, source generators once again came to the rescue. All you need to do is install the in the library where you want the classes generated and add the attribute in any file as shown below.
For any Shiny library you have installed in your library, the source generator will create a static equivalent class of the interface.
[assembly: StaticClasses("ILikeStatics")]

// core jobs
ILikeStatics.ShinyJobs.Register(...);

// ble
ILikeStatics.ShinyBle.Scan();
Pretty statics and NO dependency injection to be seen anywhere. You still have to create a startup file though ;)
Logging
Logging is generally something you want in your app. When you work in the background, you can't rely on the general dev experience of errors appearing in your VS output window.
While libraries like AppCenter and Firebase help with crashes, it can be quite dangerous to build them directly into all of your views/viewmodels/classes/etc. Logging providers also tend to disappear and change over time.
With that being said, I also didn't want to write new providers to plugin into Shiny. There was an easy answer to this problem - Use Microsoft.Extensions.Logging - the exact same library used by ASP.NET Core devs! It is a fantastical abstraction to build on and support DI out of the gate! The only thing that was missing was logging providers for AppCenter & Firebase - so I've added the following libs to Shiny


Wiring providers up is also almost just like ASP.NET Core. In your Shiny startup file:
using System;
using Shiny;
using Microsoft.Extensions.DependencyInjection;
using Microsoft.Extensions.Logging;


namespace YourApp
{
    public class YourStartup : ShinyStartup
    {
        public override void ConfigureLogging(ILoggingBuilder builder, IPlatform platform)
        {
			builder.AddFirebase();
			builder.AddAppCenter("your appcenter key");
        }
	}
}
Notifications
Notifications in Shiny still provide all of the features imaginable for your Xamarin cross platform needs.
- Scheduling
- Actions
- Sounds
- Priorities
With 2.0, Notifications had to undergo some changes to make sure things like sounds worked and response actions from notifications were consistent across platforms, thus, channels were created as to play ball properly with channels on Android and to a far lesser degree, categories on iOS.
Channels are essentially configuration groups. This provides equivalent functionality to what you find on Android 8+ such as
- Priority
- Sounds
- Actions - Text Replies, Buttons, etc
With iOS, "channels" equate in a way to categories, but apply more to the available actions on a given notification. With that in mind, I had to bring these two worlds together for a consistent design between them (oh... and that UWP thing can come along too). What's better, channel is required on Android - if you don't care about the additional functionality - omit it and Shiny will default it for you!
var manager = ShinyHost.Resolve<Shiny.Notifications.INotificationManager>(); // INJECT THIS
await manager.AddChannel(new Channel
{
Identifier = "YourChannelName",
Description = "This is your channel",
Importance = ChannelImportance.Normal // normal+ will add default sounds on android
CustomSoundPath = "notification.mp3",
Actions =
{
new ChannelAction
{
Identifier = "message",
Title = "Leave a Message",
ActionType = ChannelActionType.TextReply
},
new ChannelAction
{
Identifier = "freeticket",
Title = "Free Ticket",
ActionType = ChannelActionType.Destructive
}
}
});
// BONUS - got a resource file that you want to use instead - make sure to call this before AddChannel
channel.SetSoundFromEmbeddedResource(this.GetType().Assembly, "Samples.Resources.notification.mp3");
// now to use it
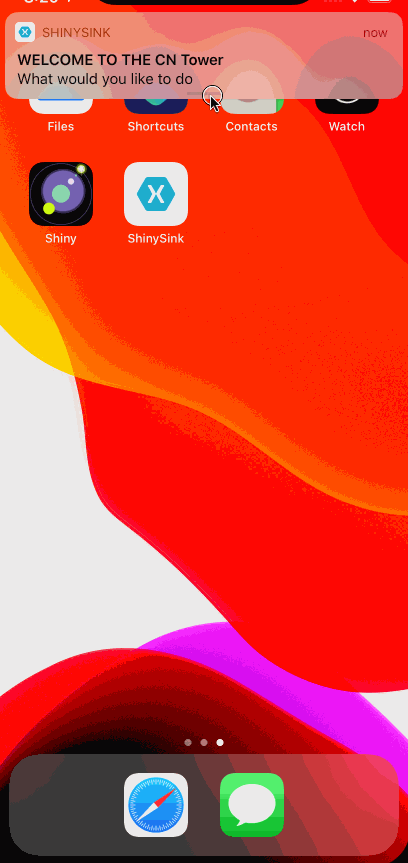
await manager.Send(
"WELCOME TO THE CN Tower",
"What would you like to do?",
"YourChannelName"
)
Which gives you this!
Push Notifications
Over the last few years, push notification providers have come and gone. Google has gone from GCM to Firebase - Other 3rd party push providers have dropped like flies for one reasons or another (ie. AppCenter). If you don't have a good design pattern in place, you aren't left a rough spot of being forced to refactor things.
As of the 2.0 release, Shiny supports:
- Native
- Firebase
- Azure Notification Hubs
- With OneSignal & AWS coming in the near future
Why is this such an awesome API? Because you can swap between push notification providers with 1 single line of code:
using Microsoft.Extensions.DependencyInjection;
using Shiny;

namespace YourNamespace
{
    public class YourShinyStartup : ShinyStartup
    {
        public override void ConfigureServices(IServiceCollection services, IPlatform platform)
        {

				// NATIVE
				services.UsePush<MyPushDelegate>(); // native

				// OR FIREBASE
				services.UseFirebaseMessaging<MyPushDelegate>();

				// OR AZURE NOTIFICATION HUBS
				services.UsePushAzureNotificationHubs<MyPushDelegate>(
					"Your Listener Connection String",
					"Your Hub Name"
				);

        }
    }
}
This doesn't cover the general push setup like the Info/Entitlements.plist setup and google-services.json. This will be covered in the docs.
Now that we've wired it up, let's request the user permission and get a token.
var result = await ShinyHost.Resolve<Shiny.Push.IPushManager>.RequestAccess();
if (result.Status == Shiny.AccessState.Available)
{
    result.RegistrationToken; // maybe you want to send this to your server to use in notifications
}
And lastly, how you actually get "pushes". This method is particularily useful if you are doing a real time app for something like chat.
Foreground
var subscription = ShinyHost
	.Resolve<Shiny.Push.IPushManager>()
	.WhenReceived(push => {
		var value = push.Data["ThisIsADictionary"];
		var title = push.Notification?.Title; // warning: notifications can be null
	});

// make sure to dispose when you're done or going to the background
subscription.Dispose();
Background (this still runs in the foreground) The background, as with all things in Shiny, is where things begin to shine. The OnReceived is where most of the magic will happen for you. From here, you can process a push notification and do things like call out to an HTTP service to refresh data, maybe acknowledge that your user is available for shift work if they have "punched" into your app.
Tag Support
Tags are a way of telling the push provider (if supported), I want to listen to these "topics". This is supported by all of the 3rd party messaging systems like Firebase & Azure Notifications Hubs.
// will not be null if supported
var tagPushManager = ShinyHost.Resolve<IPushManager>() as IPushTagSupport;
await tagPushManager.AddTag("YourTag");
await tagPushManager.RemoveTag("YourTag");
await tagPushManager.ClearTags();
await tagPushManager.SetTags("tag1", "tag2"); // remove tags that aren't present and add new tags
tagPushManager.RegisteredTags; // your current set of registered tags

// OR use the friendly extension methods off the push manager
var push = ShinyHost.Resolve<IPushManager>();
await push.TryAddTag(...);
await push.TryRemoveTag(...);
await push.TryClearTags(...);
Bluetooth LE
I really went through all of the API calls this library had to offer.
BLE is still firmly (and always will be) rooted in Reactive Extensions, but I wanted to make the APIs easier to consume for all users including myself.
Today, I'm only going to talk about 2 of the super cool features that are new with 2.0. The Managed BLE mechanics:
Managed Scans
Scanning was riddled with potential issues
- maintaining a list of unique peripherals while still watching things like the RSSI and name changes
- synchronizing list updates to your UI
- Removing a device from the list that hasn't been heard in a specific time
- preventing the scan from overwhelming your UI with redraws (and subsequently making sure you're on the UI thread when doing anything)
It took a fair of code to manage this even with Shiny, but with the new managed scanner - take a look at the difference:
This isn't even doing things like removing items if a peripheral isn't seen for a configured amount of seconds.
using System;
using System.Collections.Generic;
using System.Collections.ObjectModel;
using System.Linq;
using System.Reactive.Linq;
using System.Windows.Input;
using ReactiveUI;
using ReactiveUI.Fody.Helpers;
using Samples.Infrastructure;
using Shiny;
using Shiny.BluetoothLE;


namespace Samples.BluetoothLE
{
    public class AdapterViewModel : ViewModel
    {
        IDisposable? scanSub;


        public AdapterViewModel(IBleManager bleManager)
        {
            this.ScanToggle = ReactiveCommand.CreateFromTask(
                async () =>
                {
                    if (this.IsScanning)
                    {
                        this.StopScan();
                    }
                    else
                    {
                        this.Peripherals.Clear();
                        this.IsScanning = true;

                        this.scanSub = bleManager
                            .Scan()
                            .Buffer(TimeSpan.FromSeconds(1))
                            .SubOnMainThread(
                                results =>
                                {
                                    var list = new List<PeripheralItemViewModel>();
                                    foreach (var result in results)
                                    {
                                        var peripheral = this.Peripherals.FirstOrDefault(x => x.Equals(result.Peripheral));
                                        if (peripheral == null)
                                            peripheral = list.FirstOrDefault(x => x.Equals(result.Peripheral));

                                        if (peripheral != null)
                                        {
                                            peripheral.Update(result);
                                        }
                                        else
                                        {
                                            peripheral = new PeripheralItemViewModel(result.Peripheral);
                                            peripheral.Update(result);
                                            list.Add(peripheral);
                                        }
                                    }
                                    if (list.Any())
                                    {
                                        // XF is not able to deal with an observablelist/addrange properly
                                        foreach (var item in list)
                                            this.Peripherals.Add(item);
                                    }
                                }
                            );
                    }
                }
            );
        }


        public ICommand ScanToggle { get; }
        public ObservableCollection<PeripheralItemViewModel> Peripherals { get; } = new ObservableCollection<PeripheralItemViewModel>();
        [Reactive] public PeripheralItemViewModel? SelectedPeripheral { get; set; }
        [Reactive] public bool IsScanning { get; private set; }


        void StopScan()
        {
            this.scanSub?.Dispose();
            this.scanSub = null;
            this.IsScanning = false;
        }
    }


    public class PeripheralItemViewModel : ViewModel
    {
        public PeripheralItemViewModel(IPeripheral peripheral)
            => this.Peripheral = peripheral;


        public override bool Equals(object obj)
            => this.Peripheral.Equals(obj);

        public IPeripheral Peripheral { get; }
        public string Uuid => this.Peripheral.Uuid;

        [Reactive] public string Name { get; private set; }
        [Reactive] public int Rssi { get; private set; }
        [Reactive] public string LocalName { get; private set; }
        [Reactive] public int TxPower { get; private set; }


        public void Update(ScanResult result)
        {
            this.Name = this.Peripheral.Name;
            this.Rssi = result.Rssi;
        }
    }
}
using System;
using System.Collections.ObjectModel;
using System.Reactive.Linq;
using System.Windows.Input;
using ReactiveUI;
using ReactiveUI.Fody.Helpers;
using Shiny;
using Shiny.BluetoothLE;
using Shiny.BluetoothLE.Managed;


namespace Samples.BluetoothLE
{
    public class ManagedScanViewModel : ViewModel
    {
        readonly IManagedScan scanner;


        public ManagedScanViewModel(IBleManager bleManager)
        {
            this.scanner = bleManager
                .CreateManagedScanner(RxApp.MainThreadScheduler, TimeSpan.FromSeconds(10))
                .DisposedBy(this.DeactivateWith);

            this.Toggle = ReactiveCommand.CreateFromTask(async () =>
                this.IsBusy = await this.scanner.Toggle()
            );
        }


        public ICommand Toggle { get;  }
        [Reactive] public ManagedScanResult? SelectedPeripheral { get; set; }
        public ObservableCollection<ManagedScanResult> Peripherals
            => this.scanner.Peripherals;
    }
}
Managed Peripheral
The problem with traditional peripheral managed is that with every connection, you had to rescan for all of the services and characteristics you had. You also had to restore any notifications you had. This was painful.
Managed peripheral to the rescue. The managed peripheral will
- Work like a ViewModel - you can even have it broadcast it's changes on the UI thread for you to bind to
- Reconnect automatically
- Restore any characteristic subscription
- Read/Writes will redetect the characteristics as you used them. This saves using GetCharacteristic to continously and thereby increasing performance
- Keeps a list of characteristics you've used instead of having to call GetServices/GetCharacteristics over and over
// after a scan, you should have an IPeripheral
IGattCharacteristic reader;
IGattCharacteristic writer;
IGattCharacteristic notifier;

peripheral
    .WhenStatusChanged()
    .Subscribe(status => Device.BeginInvokeOnMainThread(() =>
    {
        // let your user know what's going on
        ViewModelStatus = peripheral.Status;
    }));

peripheral
    .WhenConnected()
    .Subscribe(peripheral =>
    {
        // these have to be tossed everytime the connection state changes - if you used these out of scope (which you probably will), you need to safety them everywhere
        this.reader = await peripheral.GetCharacteristic("serviceUUID", "characteristic");
        this.writer = await peripheral.GetCharacteristic("serviceUUID", "characteristic");
        this.notifier = await peripheral.GetCharacteristic("serviceUUID", "characteristic");

        this.notifier
            .WhenNotificationReceived()
            .Subscribe(data => Device.BeginInvokeOnMainThread(() => {
                ViewModelProperty = ""; // transform the data to a user value
            }));

        await this.notifier.EnableNotifications(true); // manage the error here!?
    });

peripheral
    .WhenNameChanged()
    .Subscribe(name => Device.BeginInvokeOnMainThread(() => ViewModelDeviceName = name)));

peripheral
    .ReadRssiContinuously()
    .ObserveOn(RxApp.MainThreadScheduler)
    .Subscribe(x => {
        // bind this to a viewmodel property
    });

// MAKE SURE TO CLEAN/UNSUBSCRIBE all of this junk when you're done with it!
// after a scan, you should have an IPeripheral
var managed = peripheral.CreateManaged(RxApp.MainThreadScheduler); // schedule
managed.StartRssi(); // and StopRssi() later if you don't want it monitored

// now you can simply bind to these in your viewmodel
managed.Status;
managed.Rssi;
managed.Name;

// and the traditional methods
managed
    .WhenNotificationReceived(
        "serviceUUID",
        "characteristicUUID"
    )
    .Subscribe(x => {
        // data for your viewmodel
    });

// note that you don't have to request a connection
await managed.EnableNotification(true, "serviceUUID", "characteristicUUID").ToTask(); // pass false when done

var readData = await managed.Read("serviceUUID", "characteristicUUID").ToTask();
await managed.Write("serviceUUID", "characteristicUUID", new byte[1] { 0x0 }).ToTask();

// when you're done with this guy, just dispose of him and he'll clean himself up and cancel the connection
managed.Dispose();
Beacons
Beacons aren't really new, but there has always been a bit of a gap here in the Xamarin community. You also had to always count on the beacon manufacturer supplying an SDK. With Shiny, you get iBeacon (yes the Apple Beacons) out of the box on all of the platforms Shiny supports. The thing I love about this library is that it is 100% C# and supports all of the monitoring/background scenarios on Android as well!
Here's a quick look at the main beacon features
The Wireup
using Microsoft.Extensions.DependencyInjection;
using Shiny;

namespace YourNamespace
{
    public class YourShinyStartup : ShinyStartup
    {
        public override void ConfigureServices(IServiceCollection services, IPlatform platform)
        {

				// NOTE: there are 2 different services for beacons
				// for ranging - finding individual beacons in the foreground
				services.UseBeaconRanging();

				// for monitoring - finding beacon groups (not individual beacons) in the background
				services.UseBeaconMonitoring<MyBeaconMonitorDelegate>();

        }
    }
}
Background Beacons
Setting up background monitoring is pretty simple. Once you've registered, simply call:
Here's your delegate:
and the code to start monitoring:
await ShinyHost
	.Resolve<Shiny.Beacons.IBeaconMonitorManager>()
	.StartMonitoring(new BeaconRegion(...)) // from here, simply setup the filter criteria you need - remember you only get 20 on iOS!
Simple right!? StartMonitoring will even request all of the appropropriate permissions!
Managed Ranging Scan
This essentially works identical to the new managed BLE scan shown earlier with all of the same benefits
- It will use best practices to ensure your UI isn't overwhelmed with updates
- It will ensure that the bound collection is properly synchronized to prevent crashes
- It will remove beacons from your list that haven't been "heard" in a configurable timestamp
- It will manage the individual items with proximity changes
// your collection to bind to
public List<BeaconViewModel> Beacons { get; } = new List<BeaconViewModel>();

// don't forget to dispose of the subscription when you're done scanning
var scanSub = ShinyHost
    .Resolve<Shiny.Beacons.IBeaconRangingManager>()
    .WhenBeaconRanged(new BeaconRegion("yourid", "Your Beacon UUID"))
    .Synchronize(this.Beacons)
    .ObserveOn(RxApp.MainThreadScheduler) // borrowed from RX - if not, you can use XF Device.BeginInvokeOnMainThread in the subscribe
    .Subscribe(
        x =>
        {
            var beacon = this.Beacons.FirstOrDefault(y => x.Equals(y.Beacon));
            if (beacon == null)
                this.Beacons.Add(new BeaconViewModel(x));
            else
            {
                beacon.Proximity = x.Proximity;
                beacon.LastSeen = DateTime.UtcNow;
            }
        }
    );

// more to cleanup
Observable
    .Interval(TimeSpan.FromSeconds(5))
    .ObserveOn(RxApp.MainThreadScheduler) // again, borring from RXUI
    .Synchronize(this.Beacons)
    .Subscribe(_ =>
    {
        var maxAge = DateTimeOffset.UtcNow.Subtract(TimeSpan.FromSeconds(10));
        var tmp = this.Beacons.Where(x => x.LastSeen < maxAge).ToList();
        foreach (var beacon in tmp)
        {
            this.Beacons.Remove(beacon);
        }
    });

public class BeaconViewModel : ReactiveObject
{
    public BeaconViewModel(Beacon beacon)
    {
        this.Beacon = beacon;
        this.Proximity = beacon.Proximity;
        this.LastSeen = DateTime.UtcNow;
    }


    public Beacon Beacon { get; }
    public ushort Major => this.Beacon.Major;
    public ushort Minor => this.Beacon.Minor;
    public string Identifier => $"Major: {this.Major} - Minor: {this.Minor}";
    public DateTime LastSeen { get; set; }
    [Reactive] public Proximity Proximity { get; set; }
}
var scanner = ShinyHost.Resolve<Shiny.Beacons.IBeaconRangingManager().CreateManagedScan();


// your viewmodel/view binding collection - note that you aren't managing it :)
public ObservableCollection<ManagedBeacon> Beacons => this.scanner.Beacons;

// start the scan
scanner.Start(new BeaconRegion("your id", "your uuid"), RxApp.MainThreadScheduler);


// and when you're ready to stop
scanner.Stop();
In Closing
This article only scrapped the surface of the 2.0 upgrade. There's more articles to come and the docs are shaping up nicely. There are also other packages like NFC, Speech to Text, BLE Hosting, Sensors, and HTTP Transfers that all still exists. They just didn't see any huge feature updates in this release.
I want to thank my good friend Dan Siegel of Prism fame for all of the help, testing, tooling, suggesting, blog articles, and poking (cough...nagging). Shiny and the Xamarin community as a whole is a better place because of him. His work on Mobile Build Tools was also immensely helpful for the Shiny samples and integration tests.
The future of Shiny now begins to look towards app services which moves from device & background servicing to truly solving real world business cases. Some of the things I'm working on:
- GeoDispatch - Push + GPS for incident management scenarios
- GPS Tags - like the airtags but with normal beacons and GPS
- Trip Tracker - tracks your runs, walks, drives, etc in one easy to use API
- OBD Communications - Talking to these things even with the Shiny BLE API is still a bit of work. This is going to make it easy!
I'm also still considering future platforms like WASM & macOS, but we'll see how the ecosystem shapes up. I also want to mention that I've been working with the MAUI team on integrations. I'll have more to share later this year as it stabilizes.
As with all OSS, Shiny is always looking for help. Head over to GitHub if you've got an issue to report, an enhancement idea, or if you just want to help out.